Archive for the ‘Interface Builder’ Category

NO MORE LOGS!!!!! (Using breakpoints in xCode)

Thursday, October 20th, 2011

I cant count the number of times I have compiled an app and found my self lost in logs. This is not not just an xCode issue I have come across this in every language/IDE I have used. For some reason we like to log it and leave it.

We give our selves all maner of excuses for not removing log statements. Whether its needed so every developer on the project knows whats happening or simply not  having time to go back and remove them. We do end up accumulating a lot of logs over the span of a project.

Dont get me wrong a well placed log can make debugging a problem much easier. There are other ways to do it though. Using breakpoints in xCode rocks logging as well as giving you a few extra perks.

Lets start with right click and editing a breakpoint to see:

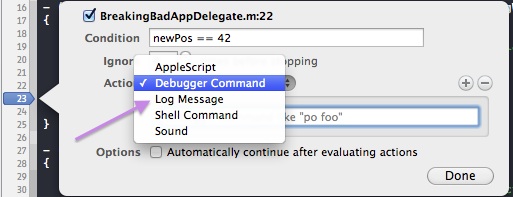
Now this is one of my favorite tools in xCode. Off that bat it allows for conditional breaks. The above break for example will not break unless the variable newPos is equal to 42. This can help with keeping an eye on a value to make sure it does not act in appropriately and if does you will get the break. How ever clicking the actions text above marked with a blue arrow will unleash the true power behind the xCode breakpoint.

Out of the 5 above options I only use two with any frequency.  The “Debugger Command” which will allow you to log, inject calls and set variables.  The “Log Message” more for english messages and keeping track of the frequency of code used.  OH ya one more thing “Log Message” supports text to speech.

Lets start with the “Debugger Command”:

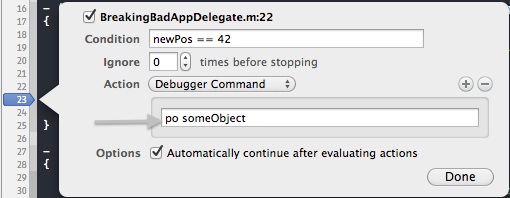
“po someObject” looks like it would print the description of someObject. Thats not all though. Dont forget the conditional above it “newPos == 42”. Combine the two and you will only print someObject to the consol when newPos is equal to 42. If you uncheck the bottom checkbox “Option” it will log the description with out breaking.

You can also use the field to more than log. Be careful  though as this can easily cause problems if you forget to remove or disable the break.

The command could be to call a function or set a variable like this: “newPos = 13”

If you were to forget to remove a command like that it could burn a lot of time tracking it down.

Moving onto the “Log Message”: 

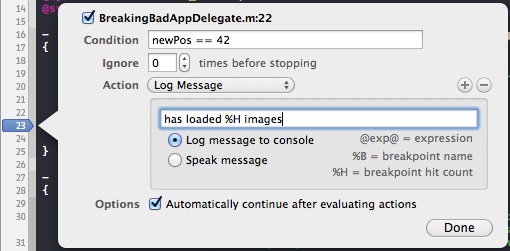
This obviously prints a message. If you look under text field to the right you can see a key. Above I used the %H which will be replaced by the number of times the break has been hit. Also if you remember to uncheck the Option at the botton it wont break but will simply log at the break.

You also get the option to have the message read out loud. This is useful if you have to keep your attention on the app and cant keep an eye on the logs.

This covers the two basic implementations. What if you need to do more than one thing like run multiple commands?

Stacking Actions:

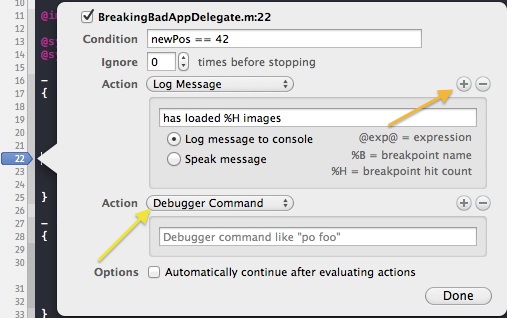
Pressing the + button as indicated above by the orange arrow. That would be the top arrow as the bottom one is yellow. (my color selection is rubbish) You get another action that runs at the same time.  You can run any number of commands in the one break which can provide very rich loggin and debugging capabilities.

Managing your breaks:

Toggling the button indicated by the green arrow you can enable or disable all your breaks in one go.

The only way to manage large numbers of logs is to search nslog and edit the file. This will cause the file to have been touched wich will obviously need versioning. Fortunately if you open the break window indicated by the blue arrow above. A list of all your breaks and their locations can be found.

Each break can be enabled or disabled by pressing the break symbol to its right as indicated by the purple arrow above.

Sharing Breaks:

Most projects are version controlled with either SVN or GIT. In all of my projects we make sure to ignore the personal settings folder in the .xcodeproj file. Which incidentally is just a folder. You can right click “Show its Contents”. In there you will find a folder called “xcuserdata” this will contain the personal profile for each developer. It will contain  the developer specific xCode settings like layout. This folder is ignored and never committed or pushed.

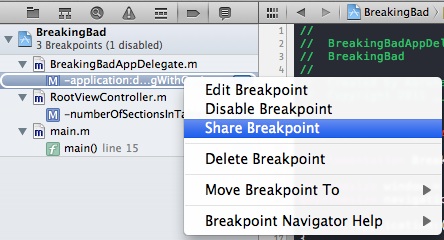
However if you were to share a breakpoint.

Right click a break point and select share as seen above. It creates a new folder in the project file. The “xcshareddata” can then be used to share break points with other developers . Say you had a particularly nasty bug and set up some particularly elaborate breaks they would be easily passed on to another developer who could help you or continue on the work.

Setting up xCode 4 Projects

Friday, June 24th, 2011

Every time I start a new xCode project i do it a little differently. I include files in some and settings in others. I have decided to put them all here to make sure i don’t miss any. If you have any other project settings, scripts, snippets or useful utils please drop a comment.

1. Enabling and dealing with Zombies:

This allows you to find errors that come from delloced objects being called upon. That normally just gives you the useless error bad access. with this enabled it should take to a class or function when you see the bad access error. This can be dealt with in 2 ways either enabling zombies in the editor thus allowing you to debug it in xCode or using instruments. If the first method does not work for you try the second.

Method 1 xCode Debug:

  1. get to the run settings by press: cmd+alt+r
  2. from the left nave select “RUN  yourApp.app”
  3. select “Arguments” from the right tab system
  4. expand if not already expanded the environment variables
  5. add NSZombieEnabled the name parameter and YES to the value parameter

Method 2 instruments Debug:

Rather than take you through it Mark Johnson has created a good video that talks you through it.

Check out his blog post for more details: http://www.markj.net/iphone-memory-debug-nszombie/

2. Replacing NSLog with PSLog

PSLog is a NSLog replacment. I have seen it arround for a while now. Basicly it gives you a bit more info like where log is called from. The only problem with it, is the dependancy it creates on having to keep importing PSLog in every one of your projects.

I modified it so you can use NSLog in your code and at compile time in debug mode it replaces your NSLogs with PSLogs. During deploy it replaces NSLog with comments. This way it removes any depandacies on the PSLog function.

How ever this only applies to the PSLog function it self none of its expanded counter parts like PSLogDebug. Using PSLogDebug will maintain a dependancy.

Check it out:

https://github.com/abeazam/PSLog.git

If you #import “PSLog.h” in the .pch file in the support group in your project you wont have import it in every file you want to use it. which Helps the whole dependancy issue.

TODO, FIXME converted to warnings

I duno if you noticed but if you add a //TODO: or //FIXME: comments it appears  in the function menu. The problem with that though is you need to be in the class to see the list. Ideally what I wanted was a list of todos that I can see them all in one place. You can do that by adding a bash script that adds them as warnings.

  1. Select your project in the left hand menu
  2. Select your project in the target right hand menu
  3. Click “Add Build Phase” in the bottom right.
  4. Select “Add Run Script”
  5. Past in the script below and your done 🙂

[shell]KEYWORDS="TODO:|FIXME:|???:|!!!:"
find "{SRCROOT}" ( -name "*.h" -or -name "*.m" ) -print0 | xargs -0 egrep –with-filename –line-number –only-matching "($KEYWORDS).*$" | perl -p -e "s/($KEYWORDS)/ warning: $1/"[/shell]

i think this guy might have come up with it: http://deallocatedobjects.com/2011/05/11/show-todos-and-fixmes-as-warnings-in-xcode-4/

Snippets
Snippets are one of the things that stood out to me in xCode. Here are a few of mine:

Completion shortcut – log
Completion scope – function and method

[shell]
NSLog(@"<#value#>: %<#@#>",<#var#>);
[/shell]

Completion shortcut – imp
Completion scope – processor directive

[shell] #import "<#header#>"

[/shell]

If you want to make a variable just stick them in <#here#>.

Crash Log Server

http://quincykit.net/
https://github.com/therealkerni/QuincyKit

Sends the crash report to a server with a single line of code. I have not tried the push notifacsion but every thing else seems to work resonably.

http://quincykit.net/

Please let me know if you find anything else that helps keep a project in shape.

Extending(Subclassing) UIButton in Objective-C

Friday, July 10th, 2009

After playing around with UIButton class for a while I found Apple have been very sneaky with some  of their UI classes.

What it appears they have done is use the UIButton class as a sort of wrapper for a number of private button classes. “UIRoundedRectButton” is one of those classes.

“UIRoundedRectButton” is a private class so it can not be extended(subclassed). The initilizers normaly return an instance of self and if that self is not the class type trying to hold it there will be trouble. The problem is if you initialise UIButton with buttonWithType the class it returns is a private class. If you try and extended the UIButton once your custom class is initialized it returns a “UIRoundedRectButton” object which is private so you can not contain it.

If you try the code below which uses the description you can see the object description is not UIButton.

[c]UIButton *myButton = [UIButton buttonWithType:UIButtonTypeRoundedRect];
NSLog(@"myButton type: %@", [myButton description]);[/c]

In short you can not extend UIButton and initialize it with buttonWithType  in Objective C. On the other hand you can extened UIButton for a button in interface builder. If  you use interface builder you need to use initWithCoder as the initialiser. While interface builder does the private stuff.