I cant count the number of times I have compiled an app and found my self lost in logs. This is not not just an xCode issue I have come across this in every language/IDE I have used. For some reason we like to log it and leave it.
We give our selves all maner of excuses for not removing log statements. Whether its needed so every developer on the project knows whats happening or simply not having time to go back and remove them. We do end up accumulating a lot of logs over the span of a project.
Dont get me wrong a well placed log can make debugging a problem much easier. There are other ways to do it though. Using breakpoints in xCode rocks logging as well as giving you a few extra perks.
Lets start with right click and editing a breakpoint to see:
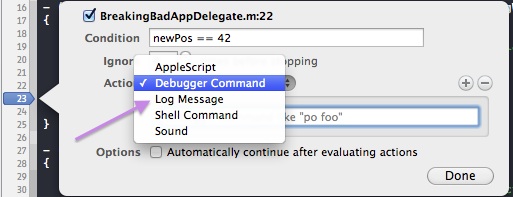
Now this is one of my favorite tools in xCode. Off that bat it allows for conditional breaks. The above break for example will not break unless the variable newPos is equal to 42. This can help with keeping an eye on a value to make sure it does not act in appropriately and if does you will get the break. How ever clicking the actions text above marked with a blue arrow will unleash the true power behind the xCode breakpoint.
Out of the 5 above options I only use two with any frequency. The “Debugger Command” which will allow you to log, inject calls and set variables. The “Log Message” more for english messages and keeping track of the frequency of code used. OH ya one more thing “Log Message” supports text to speech.
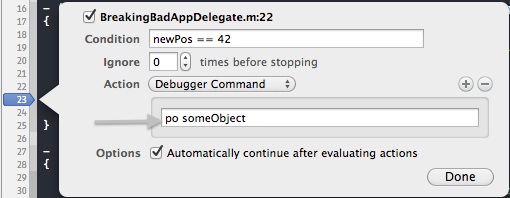
Lets start with the “Debugger Command”:
“po someObject” looks like it would print the description of someObject. Thats not all though. Dont forget the conditional above it “newPos == 42”. Combine the two and you will only print someObject to the consol when newPos is equal to 42. If you uncheck the bottom checkbox “Option” it will log the description with out breaking.
You can also use the field to more than log. Be careful though as this can easily cause problems if you forget to remove or disable the break.
The command could be to call a function or set a variable like this: “newPos = 13”
If you were to forget to remove a command like that it could burn a lot of time tracking it down.
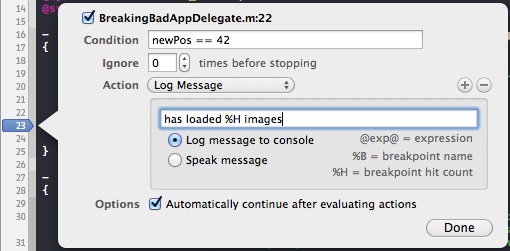
Moving onto the “Log Message”:
This obviously prints a message. If you look under text field to the right you can see a key. Above I used the %H which will be replaced by the number of times the break has been hit. Also if you remember to uncheck the Option at the botton it wont break but will simply log at the break.
You also get the option to have the message read out loud. This is useful if you have to keep your attention on the app and cant keep an eye on the logs.
This covers the two basic implementations. What if you need to do more than one thing like run multiple commands?
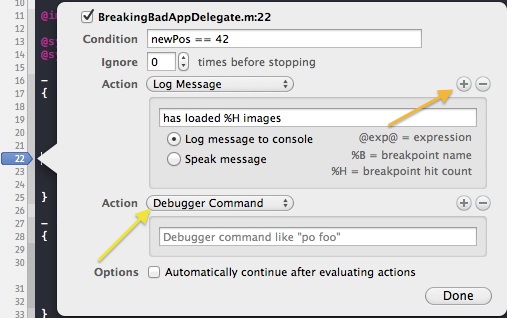
Stacking Actions:
Pressing the + button as indicated above by the orange arrow. That would be the top arrow as the bottom one is yellow. (my color selection is rubbish) You get another action that runs at the same time. You can run any number of commands in the one break which can provide very rich loggin and debugging capabilities.
Managing your breaks:
Toggling the button indicated by the green arrow you can enable or disable all your breaks in one go.
The only way to manage large numbers of logs is to search nslog and edit the file. This will cause the file to have been touched wich will obviously need versioning. Fortunately if you open the break window indicated by the blue arrow above. A list of all your breaks and their locations can be found.
Each break can be enabled or disabled by pressing the break symbol to its right as indicated by the purple arrow above.
Sharing Breaks:
Most projects are version controlled with either SVN or GIT. In all of my projects we make sure to ignore the personal settings folder in the .xcodeproj file. Which incidentally is just a folder. You can right click “Show its Contents”. In there you will find a folder called “xcuserdata” this will contain the personal profile for each developer. It will contain the developer specific xCode settings like layout. This folder is ignored and never committed or pushed.
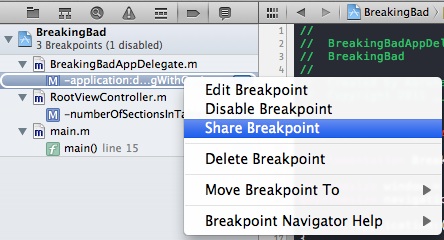
However if you were to share a breakpoint.
Right click a break point and select share as seen above. It creates a new folder in the project file. The “xcshareddata” can then be used to share break points with other developers . Say you had a particularly nasty bug and set up some particularly elaborate breaks they would be easily passed on to another developer who could help you or continue on the work.


Cool! Thanks Abe 🙂
Great article, I should try to use this more. At the moment it’s logs everywhere :S