The description method

Tuesday, October 11th, 2011

Any object can implement the description method that is used to return a description of the contents of a receiver. The problem i have always found with this method. Is keeping the method up to date during the development process. Also getting other developers working on the project also keeping it up to date.

With that problem in mind I put together this method that will automatically generate the string and list all available properties in the the receiver. It will print out when the instance is used in NSLog or or printed using the GDB debugger commands in my previous post.

[objc]
#import <objc/runtime.h>

//this will automatically create a description
//based on the properties
– (NSString*) description
{
unsigned int propCount, i;
//gets a list of all properties in the
//created in this class and the property count
objc_property_t *properties = class_copyPropertyList([self class], &propCount);

//used to hold all the properties
NSMutableArray *keys = [NSMutableArray arrayWithCapacity:propCount];

for(i = 0; i < propCount; i++)
{
//extracts a single property
objc_property_t property = properties[i];
//gets the property name
const char *propName = property_getName(property);

//checks to make sure there is a name
if(propName)
{
//converts the name to a usable object
NSString *propertyName = [NSString stringWithCString:propName
encoding:NSNonLossyASCIIStringEncoding];
//adds it to a list of keys
[keys addObject:propertyName];
}
}
//frees the properties
free(properties);

//attempt to simulate the dictionary log by using the %p to get the memory address
//the last %@ is used for all the items added to the dictionary
return [NSString stringWithFormat:@"<%@: %p; %@>",
NSStringFromClass([self class]),
self,
[self dictionaryWithValuesForKeys:keys]];
}
[/objc]

You can also find it on my custom xCode 4 templates here on github. Right at the bottom the class.

xCode GDB Debugger Commands

Thursday, September 22nd, 2011

One of the things that I struggled with going from eclipse and Visual Studio to xCode was the the debugger.  Most of the objects have memory references rather than values. For a long time while developing iOS apps all i would get, or though I had was one cryptic error message. Till I discovered po which stands for print object. This allowed me to print out the contents of an object which can be very useful.

Here is  list of gdb commands: (Warning properties are not identified by the debugger so dont use anything with dot notation)

po – print object – can be used to print out the likes of NSStrings and NSDictionaries
use: po someObject

print – prints base types – used to print out to the screen ints floats and the like
use: print myFloat

set – set a variable – allows you to set variables
use:  set someString=@”test”

call – calls a method – can be used to call methods or the properties getters and setters
use: – call [someObjectInstance withString:@”newString”];

n – Next – always you to travers your code during breck
use: n

There are 2 main places you can use the commands.

The first is the consol output during a break or crash just after the gdb:

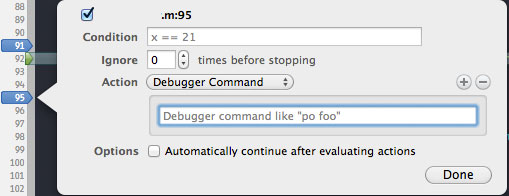
The second is in a break point first set a break point then click the “Click to add action text” ass seen bellow.

Now you can add you command in the newly available text field that will always be triggered at that point in the code.

Carful with the break point triggers not to confuse your self if you put sets or calls in there.

Setting up xCode 4 Projects

Friday, June 24th, 2011

Every time I start a new xCode project i do it a little differently. I include files in some and settings in others. I have decided to put them all here to make sure i don’t miss any. If you have any other project settings, scripts, snippets or useful utils please drop a comment.

1. Enabling and dealing with Zombies:

This allows you to find errors that come from delloced objects being called upon. That normally just gives you the useless error bad access. with this enabled it should take to a class or function when you see the bad access error. This can be dealt with in 2 ways either enabling zombies in the editor thus allowing you to debug it in xCode or using instruments. If the first method does not work for you try the second.

Method 1 xCode Debug:

  1. get to the run settings by press: cmd+alt+r
  2. from the left nave select “RUN  yourApp.app”
  3. select “Arguments” from the right tab system
  4. expand if not already expanded the environment variables
  5. add NSZombieEnabled the name parameter and YES to the value parameter

Method 2 instruments Debug:

Rather than take you through it Mark Johnson has created a good video that talks you through it.

Check out his blog post for more details: http://www.markj.net/iphone-memory-debug-nszombie/

2. Replacing NSLog with PSLog

PSLog is a NSLog replacment. I have seen it arround for a while now. Basicly it gives you a bit more info like where log is called from. The only problem with it, is the dependancy it creates on having to keep importing PSLog in every one of your projects.

I modified it so you can use NSLog in your code and at compile time in debug mode it replaces your NSLogs with PSLogs. During deploy it replaces NSLog with comments. This way it removes any depandacies on the PSLog function.

How ever this only applies to the PSLog function it self none of its expanded counter parts like PSLogDebug. Using PSLogDebug will maintain a dependancy.

Check it out:

https://github.com/abeazam/PSLog.git

If you #import “PSLog.h” in the .pch file in the support group in your project you wont have import it in every file you want to use it. which Helps the whole dependancy issue.

TODO, FIXME converted to warnings

I duno if you noticed but if you add a //TODO: or //FIXME: comments it appears  in the function menu. The problem with that though is you need to be in the class to see the list. Ideally what I wanted was a list of todos that I can see them all in one place. You can do that by adding a bash script that adds them as warnings.

  1. Select your project in the left hand menu
  2. Select your project in the target right hand menu
  3. Click “Add Build Phase” in the bottom right.
  4. Select “Add Run Script”
  5. Past in the script below and your done 🙂

[shell]KEYWORDS="TODO:|FIXME:|???:|!!!:"
find "{SRCROOT}" ( -name "*.h" -or -name "*.m" ) -print0 | xargs -0 egrep –with-filename –line-number –only-matching "($KEYWORDS).*$" | perl -p -e "s/($KEYWORDS)/ warning: $1/"[/shell]

i think this guy might have come up with it: http://deallocatedobjects.com/2011/05/11/show-todos-and-fixmes-as-warnings-in-xcode-4/

Snippets
Snippets are one of the things that stood out to me in xCode. Here are a few of mine:

Completion shortcut – log
Completion scope – function and method

[shell]
NSLog(@"<#value#>: %<#@#>",<#var#>);
[/shell]

Completion shortcut – imp
Completion scope – processor directive

[shell] #import "<#header#>"

[/shell]

If you want to make a variable just stick them in <#here#>.

Crash Log Server

http://quincykit.net/
https://github.com/therealkerni/QuincyKit

Sends the crash report to a server with a single line of code. I have not tried the push notifacsion but every thing else seems to work resonably.

http://quincykit.net/

Please let me know if you find anything else that helps keep a project in shape.

Unix and SSH Files From Scratch

Friday, May 6th, 2011

Again I am assuming some Technical/Programming experience. No Unix experience except for my previous post. I am going to cover some default files. As well as how to make you own bash file. I am going to try and explain this through a tutorial on how to add a welcome message to your login.

The first thing you need to do is decide on a message. You could just have a one line message like “Ola welcome to the server” which would be fine.

On the other hand if you really wana go at it. You could get some ascii art or text. Personally I am far from an ascii artist but I have ascii every where. There are a few websites that have ascii fonts. All you have to do is type in what you want and it will write it in ascii for you. http://www.network-science.de/ascii/ was the last site I tried. There are loads out there.

If you have administrative rights on your box creating your welcome msg is easy. If you dont have admin rights thats fine, you can use Option 2  which is also easy.

If you are unsure if you have admin access try and open an editor with admin access if it lets you in, BINGO your admin. Type in sudo pico enter your password when prompted if it lets into the pico editor then you have admin.

[shell]sudo pico[/shell]


Option 1(if you are admin)

There is a file named motd. It is just a text file without the txt file extension. Anything saved in the file will be displayed when you log in.

Step 1 Navigate to your root of your system

[shell] cd / [/shell]

Step 2 Navigate to the etc folder

[shell] cd etc [/shell]

Step 3 Edit the motd file with admin access

[shell] sudo pico motd [/shell]

Step 4 Type or copy/past your welcome msg in to your editor

Step 5 Save and exit

Now if you log off the server and log in again you should see your msg.


Option 2(if you are on a shared host or if you dont have admin)

So you dont have admin access and you want to trigger something at login. Well what you do is save the msg in a text file then prompt it to be displayed. There is  file that runs every time you log in named .bash_profile. What we will do is create a bash file that when run will display the text from the file. Now this is a bit of a round about way of doing it but it helps cover both bash files and the .bash_profile.

Anything you want to run at login can be added to the .bash_profile file.

A bash file is a Unix file that runs a group of commands. It has a language behind it that contains most of what you would expect if statements, loops, etc. Bash stands for Bourne Again Shell. you can use it to make your server practically do anything.

Step 1 Navigate to your home directory. This is the directory u start in when u log in.

Step 2 Create a new text file called login.txt

[shell]touch login.txt[/shell]

Step 3 Assuming you have your msg ready or your ascii if not go get it se the links above.

Step 4 Open the the login.txt file in an editor

[shell]pico login.txt[/shell]

Step 5 Past your msg save and exit pico

Step 6 Find the location of you bash

[shell]echo $SHELL[/shell]

Step 7 Copy the return value it is more than likely this:   /bin/bash   but not necessarily

Step 8 Create a new file in you home directory again which is the bash script

[shell]touch login.sh[/shell]

Step 9 Edit the bash script in pico

[shell]pico login.sh[/shell]

Step 10 Type in #! then the bash location that you copied in Step 7

[shell]#!/bin/bash[/shell]

Step 11 Type the command that will display the text

[shell]cat login.txt[/shell]

Step 12 Save and Exit

Step 13 While still in the root set the permisions for bash file

[shell]chmod 700 ./login.sh[/shell]

Step 14 In your home directory edit your .bash_profile so it runs the login bash at login time

[shell]pico .bash_profile[/shell]

Step 15 Add to the bottom of the file the command that runs your bash

[shell]./login.sh[/shell]

Step 16 Save and Exit

Thats all there is. Next time you login you should see your msg. This covers of the basics if you want to know how to write complex scripts there are loads of guides and tutorials to help you on your way out on the interwebs,

Unix and SSH Commands From Scratch

Tuesday, April 19th, 2011

In my last post I discussed node.js. This can be installed on a server. Originally I wanted to talk through how I installed Node.js and what plugins I have come to use. I took a look around and found a few ppl struggling with ssh. I figured best to cover some of the basics of server based commands first. I expect any one reading this have some Technical/Programming experience.

I am going to assume you have a sever and are working from a Unix based machine(Linux or OSX).

Accessing your server:

[shell]ssh usr@host[/shell]

usr: would be your user name to the server for the sake if this example lets say your user name is peter

host: is your server url/ip lets say for this example its Watson.com

so in your command window type in your server details press enter:

[shell]#these are fake details use your user name and server in their place
ssh peter@watson.com[/shell]

Enter you password and you should be in.

Basic Commands:

Here is a list of basic commands to help you move around the folders and manipulate the files.


[shell]
#this is how you comment if you where to write a script file
ls
[/shell]

Type that and it will list all the files and folders


[shell]ls -a[/shell]

That will show all the hidden files too.


[shell]cd somefolder/[/shell]

Primary navigation command.


[shell]cd ..[/shell]

goes up a folder.


[shell]cd folderName[/shell]

navigates to the folder with the name folderName


[shell]cd ~[/shell]

Takes you to your home directory.


[shell]mkdir newDirName[/shell]

creates a directory


[shell]cp txtFile.txt somefolder/copyOfFile.txt[/shell]

copies file.txt to someFolder and renames the file.


[shell]mv txtFile.txt somefolder/copyOfFile.txt[/shell]

moves file.txt to someFolder and renames the file.


[shell]rm txtFile.txt[/shell]

deletes txtFile.txt


[shell]touch newTextFile.txt[/shell]

touch creates the file with no content


[shell]top[/shell]

Displays resources and process


Downloading

[shell]wget http://www.google.co.uk/index.html[/shell]
wget downloads a file at a location the above line downloads googles index.html page


[shell]git clone https://github.com/joyent/node.git[/shell]
git clone will clone a git repository to your current location


[shell]svn checkout http://as3-youtube-data-api.googlecode.com/svn/trunk/ as3-youtube-data-api-read-only[/shell]

svn checkout checks out a svn repo


Editors
You will edit a lot of text files on server a far bit. So I will list 3 Degrees of editors.

Easy

[shell]pico textFile.txt[/shell]

this one is easy all shortcuts (^ is ctrl) are listed at the bottom but not as powerful as the other two.

Medium

[shell]vi  textFile.txt[/shell]

this is obviously more powerful than pico but to achieve that it uses states when u start you can’t type you need to enable typing. This is just a taster of how to use it. There are entire pages on the web that list all the shortcuts.

i
press i when u are not in edit mode and it will insert the cursor to allow you to type

press ESC then :wq
esc enters command mode w stands for write and q stands for quite so save and exit

press ESC then :q!
quit with out saving

Hard

[shell]vim  textFile.txt[/shell]

best text editor i could write a whole post on it. If you wana use google it.

Compiling Code
In Unix you can tailer a build for your system. so its compiled for you and you alone 🙂 Lets say you downloaded a project from the internet using git or svn.

Complete in order below

cd
to the location of the files

[shell]./configure[/shell]

set settings in the build for your machine its automated it just does it


[shell]make[/shell]

compiles your code

[shell]make check[/shell]

tests the compile

[shell]make install[/shell]

installs your compiled code

[shell]make clean[/shell]

Removes all the compiled files and cleans up for you

Comming soon 🙂 sudo pico /etc/motd

Node.js

Friday, April 1st, 2011

links: Node.js npm forever

Over the years I have dipped in and out of a few different server side languages. PHP, Ruby, ColdFusion and Java to mention some. I guess the root of my issues with them is how infrequently I need to use them. It does not help that none of them share any development paradigms outside OO.

Some one mentioned Node.js to me when I discussed some ideas I was toying with. I immediately blanked them on the grounds that JS is client side and I specifically had a server side problem to resolve. I brushed the dust of my PHP book and got to work.

As what always happens to me when I am building things in PHP I ran into problems. As always I vent at a few friends to blow of some steam. As I did this people I knew kept on mentioning Node.js.

I eventually caved and looked it up. What no one had mention or in some case I didn’t give them a chance to mention. Is that Node.js is Googles V8 engine running on a server doing all those pesky backend Networking tasks in JavaScript. A Open Source ECMAScript platform will the internet ever ceases to amaze me.

After watching the video on the node.js website see link above I was flabbergasted at how easy it was. I figured I could build my solusion in no more than one day. I installed it on my server. Which took  all of 10 min. no really thats how long it took me to download the files compile the latest build and install it. It was disgracefully fast.

So I got to work. One and a half hours later I was was looking at my editor thinking surely i cant be done there must be now way its that easy to set up two TCP servers and an http server. Yet it was done plain as day all running and working.

If you are going to give it a try i recommend npm which is the plugin manger for Node.js and using it to install forever which helps you manege which servers you want to keep up. all links are at the top of the post. Obviously i would recommend it. I have even heard it runs on some shared hosts admittedly a little cut down but more than enough to inspire.

cocos2d: WARNING: format is not supported for CCSpriteFrameCache

Monday, September 13th, 2010

I have been working away at same iPhone game development.

I found a nice sprite sheet editor zwoptex: http://zwoptexapp.com which is compatible with the engine I was using cocos2d: http://code.google.com/p/cocos2d-iphone/

Little did I know there was some version issues between the exporter and the engine. Zwoptex exports a png and a plist that contains all the meta-data for the sprite sheet. If you are getting the bellow mentioned error you might be reading online various suggestions like installing older versions of zwoptex or a new versions of the  engine.

Solution:

As it turns out all you have to do is un-check  rotate from inside zwoptex publish the files. Edit the plist generated by zowptex and change the root>>metadata>>format number from 2 to 1 save clean your build recompile and your done.

cocos2d error:

ocos2d: WARNING: format is not supported for CCSpriteFrameCache addSpriteFramesWithDictionary:texture:

Full Error:

Terminating app due to uncaught exception ‘NSInternalInconsistencyException’, reason: ‘cocos2d: WARNING: format is not supported for CCSpriteFrameCache addSpriteFramesWithDictionary:texture:’
2010-09-13 16:01:36.353 TileMap[12915:40b] Stack: (
46889040,
48046892,
46626571,
4768532,
450434,
452386,
10372,
298606,
9808,
8936,
8317326,
8321359,
8346942,
8328439,
8360408,
57418108,
46168220,
46164136,
8319521,
8352626
)

Password Protecting Mail.app and your e-mails

Monday, September 6th, 2010

One of the issues I had with using the Mail.app on OSX is its lack of security.

If some one is logged in as you they then get access to everything else on you machine like say your mail client.

Now I really like the Mail client. I have no intention of switching clients. So a solution was required.

After a little digging i found there was no mods for Mail. No hacks or any other means in which to password protect the client and the mail. Eventual I realised I was doing it all wrong its not the emails and the client that can be protected but where they are being stored is what can be protected.

I finally realised if I created a encrypted dmg and ran everything from there it would yield the same results.

Aim:
Get both the Mail.app and my email onto a password protected drive.

Process:

  1. Open Disk Utility to create the encrypted DMG /Applications/Utilities/Disk Utility.app
  2. Click “New Image” on the top
  3. Select a Name and a save as location
  4. Further down under size select the size I made mine 10GB  this depends on how much mail you expect to store locally
  5. Below that make sure select the Encryption
  6. Hit create set the password and now you should have a mounted encrypted drive
  7. Move your Mail app  from /Applications/ to the root of your mounted encrypted drive cut it don’t copy it
  8. Then make make an alias of the Mail app in the in the /Applications/ folder(ctrl dragging the icon)
  9. Now you need to cut and past your emails to the encrypted drive find the folder /Users/YOUR_USERNAME/Library/Mail and past it in the encrypted drive
  10. Now make an alias of the mail folder from you encrypted drive  back to the /Users/abraham.azam/Library/ (ctrl dragging the folder)
  11. Finished.

If you click the mail icon on the Dock it should now access your mail client and your amils from a scure and ecrypted location. if you unmount the drive and click the icon it will promt you for the password to the dmg then opens the mail app.

please let em know what you think of these steps 🙂

Windows 7 Mobile SDK

Tuesday, March 16th, 2010

Mix is upon us ons again. Microsoft has finally released the Windows 7 Mobile SDK which can be found here. There is a supporting site with information here about the new platform and some examples.

Win7 Mobile is not built on previous windows mobile platform but a clean concept. The development tools are new to mobile too. It utilises  Silverlight and XNA for application and games development. So it will start with a pretty big developer base.

I was hoping to get a peak at the new Windows Mobile OS from the emulator but all I found was the  browser. The UI and other things are there. The ability to compile and tests apps so early is also very nice put none of the rumoured integration with core apps features seem to be available yet.  You do on the other hand get to see what the feel of there user journey is like and how the menus and navs will work.

All and all worth a look.

Edit:

Here is some new Blend 4 + Windows 7 Mobile plugin in for Blend

and

Here is some nice tutorials.

Google Buzz

Wednesday, February 10th, 2010

Well here it is Googles latest attempt  to break into the Social market. Possibly one of the few pieces of the internet Google has not had a successful run at. Google Buzz is completely integrated into you Gmail and accessible via your phone assuming you have an Android 2.0 or iPhone. Other phones promised see the support page here.

What sets it apart from facebook and twitter?  Well it supports in-line content like video and images unlike twitter which relays on third parties. Facebook is User/social group centric where Buzz is location centric. Now you can Buzz into the Buzz sphere or keep it private, to you close friends so its smiler to Twitter from that respect.

The first thing that gets me is the fact that I can press the nearby button or enable it on Google maps and just see where the buzz is. I can see the security issues with it though. By the end of the day every site with a security team will have at least one article that outlines the security risks of sharing your Geo-coordinates. The most practical thing about it though is that it propagates your public feeds from your current social network sites.

At the end of the day it don’t matter what they say what matters is user base. With access to your entire email contacts list any one to give it a try will instantly know who else is giving it a try. So what will the word of the people be?   Buzz or not to Buzz?